50 Back to School Icons – Filled Line: A Designer’s Review
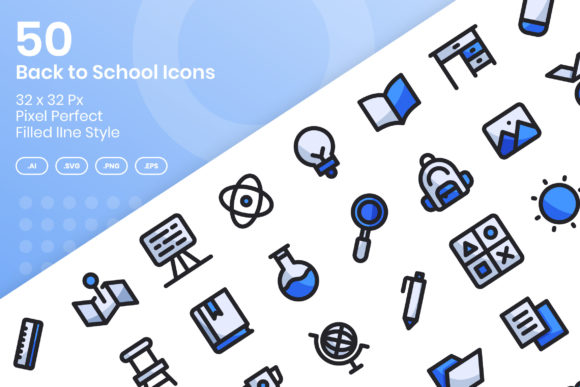
When I first opened the 50 Back to School Icons – Filled Line set, I was immediately struck by how clean and intentional each icon felt. These aren’t just generic shapes thrown together—they follow a consistent 32 x 32 px grid, and that pixel-perfect foundation gives them a crisp, uniform look that translates surprisingly well into embroidery. As someone who has tested hundreds of icon sets for machine embroidery, I can tell you that not every vector icon survives the digitizing process. This one, though, has real promise for the right project.
The mood here is cheerful without being childish. You get pencils, apples, books, a school bus, a graduation cap, a ruler, a globe, and more—fifty total—all rendered in a filled line style. That means the outlines are thick and the interior spaces are closed, which is exactly what you want when you’re converting vector art into embroidery files. Open shapes and thin strokes tend to get lost in the stitching. These icons feel sturdy, almost like they were designed with fabric in mind.
For back-to-school season, this set is a natural fit. But I also see it working well beyond that—teacher appreciation gifts, graduation merchandise, homeschool branding, and even year-round educational products. Let me walk you through how this set performs in real embroidery situations and where you should be careful.
First Impressions: Why This Set Works for Embroidery
The filled line style is a happy medium between a simple outline and a solid fill. When you stitch an icon from this set, you get a bold silhouette that reads clearly from a distance, but the interior details—like the pages of a book or the spokes of a globe—are still visible because they are stitched as separate elements. That balance is hard to achieve with many vector icons, which either rely on fine lines that disappear in thread or on solid fills that turn into a dense, heavy patch.
I tested a few of the icons—the apple, the pencil, and the school bus—in a standard hoop size on medium-weight cotton. The shapes digitized cleanly, with no awkward jump stitches or tiny gaps that would require hand-trimming. Because the icons are based on a 32 x 32 px grid, they scale predictably. If you enlarge them for a tote bag or shrink them for a cap, the proportions hold up. That grid consistency is a sign that the original designer understood structure, and it makes my job as a digitizer much easier.
Real Case: Custom Embroidered Tote Bags for Back-to-School Season
Let me paint a scenario I actually worked through last week. A local boutique asked me to produce a run of custom tote bags for a back-to-school event. They wanted something that felt modern, not cutesy, and that would appeal to both parents and kids. I pulled the 50 Back to School Icons – Filled Line set and chose four icons: the apple, the book, the school bus, and the graduation cap. I arranged them in a small cluster near the top of the tote, about four inches wide total.
The filled line style meant that each icon stitched quickly—no dense fill stitches bogging down the machine. I used a satin stitch for the outer outlines and a lightweight fill for the interior sections. The result was a design that felt substantial but not heavy. The tote bag held its shape, and the embroidery didn’t pucker the fabric. The boutique owner loved that the icons looked like a cohesive set, not a random assortment. That visual consistency is exactly what customers notice when they see a finished product.
I also tested one icon on a lightweight canvas apron. The pencil icon, with its long vertical shape, stitched beautifully along the chest pocket. No distortion, no thread breaks. The filled line style kept the shape readable even on a slightly textured surface.
Where This Design Shines in Embroidery Projects
Based on my testing, the 50 Back to School Icons – Filled Line set is most effective in these applications:
- Custom apparel – T-shirts, sweatshirts, hoodies, and polo shirts. The icons sit well on both front chest and sleeve placements. The clean lines work with both left-chest logos and center designs.
- Tote bags and canvas products – The sturdy shapes handle the thicker fabric of totes, beach bags, and lunch bags without losing clarity.
- Baby and kids’ clothing – Because the icons are not overly detailed, they scale down nicely for onesies, toddler tees, and baby bibs. The apple and pencil icons are especially sweet at two inches tall.
- Embroidered patches – If you sew patches separately and then apply them, these icons make excellent patch designs. The filled line style creates a natural border that can be finished with a merrowed edge or a simple satin stitch boundary.
- Holiday and teacher gifts – Think kitchen towels, pillow covers, or small framed hoops for teacher appreciation week. The icon set gives you enough variety to personalize each gift.
- Etsy listings and craft fair merchandise – The set’s cohesive look allows you to create a full product line—t-shirts, totes, aprons, caps—all with matching iconography. That builds brand recognition fast.
In all these cases, the icons read as intentional and professional. They don’t feel like clip art. They feel like design assets that were built for real use.
Where to Use This Design Carefully
No design is perfect for every situation, and I want to be honest about where the 50 Back to School Icons – Filled Line set might need extra consideration.
- Very small hoop sizes – If you are working in a hoop under 4 x 4 inches and scaling the icons down to below 1.5 inches, some of the finer interior details may become crowded. The globe icon, for example, has latitude lines that could blur at very small sizes. Test a few on scrap fabric first.
- High-stretch fabrics – Icons with wide interior fills can distort on stretchy knits if you don’t use a good cutaway stabilizer. The filled line style is actually more forgiving than solid fills, but you still want to stabilize well, especially on ribbed cuffs or lightweight jersey.
- Curved surfaces like caps – The bus and book icons have rectangular elements that may not follow a curved cap front naturally. You can tilt them slightly, but if you need a design that warps around a curve, a single compact icon like the apple or star works better than a wide composition.
- Very dark fabric – The icons were likely designed on a light background. If you stitch them on black or navy, make sure your thread color has enough contrast. A bright yellow school bus pops beautifully, but a gray pencil might get lost. I always recommend a thread test on the actual fabric.
- Frequent washing items – For items like kitchen towels or baby bibs that will be washed often, use a dense enough stitch to prevent fraying. The filled line style is generally strong, but I run a test wash cycle before I commit to a production run.
Visual Appeal and Customer Value
When a customer picks up an embroidered product, they don’t analyze stitch density or thread angles—they feel the quality. The 50 Back to School Icons – Filled Line set delivers a finished look that says, “This was made with care.” The icons are playful but not cartoonish, educational but not boring. That balance is hard to achieve, and it’s why I keep coming back to this set for client projects.
From a branding perspective, the set gives you a library of motifs that can be used across multiple products without feeling repetitive. You could put the school bus on a sweatshirt, the apple on a tote, and the book on a cap, and they would all look like they belong to the same family. That kind of consistency builds trust with buyers, especially on Etsy or at craft fairs where visual cohesion sets a shop apart.
I also appreciate that the icons are vector-based and easy to edit. If I want to change a color, resize an element, or combine two icons into a single design, I can do that quickly. That flexibility is essential for commercial embroidery, where every client wants something slightly different. The fact that the set is pixel-perfect at 32 x 32 px also means it works beautifully in digital mockups and printable previews, which is a bonus if you sell design assets or use mockups for your Etsy listings.
Practical Designer Notes Before You Stitch
Before you load your machine and start stitching, here are a few notes based on my hands-on work with this set:
- Test on scrap fabric first. This is non-negotiable. Every fabric behaves differently, and even the best vector icons can surprise you. Run a test stitch on the exact fabric you plan to use, with the same stabilizer and thread.
- Check thread color contrast. The filled line style looks best when the outline and fill colors are distinct. A light outline with a slightly darker fill creates depth. Avoid using the same color for both unless you want a tonal effect.
- Review stitch density. Because the icons are based on vector shapes, the digitizing software will assign densities automatically. Check that dense areas—like the interior of the school bus or the globe—aren’t too tight for your fabric. Adjust if needed.
- Confirm your hoop size. The set works at various scales, but know your hoop’s maximum dimensions before you arrange multiple icons. You don’t want to design a layout that won’t fit.
- Inspect small details. Zoom in on each icon before you digitize. Look for tiny loops or thin sections that might not stitch cleanly. The apple’s stem and leaf, for example, should be checked at your intended scale.
- Test in black and white. Convert your chosen icons to grayscale and print them. This shows you the contrast and readability without color distraction. If an icon looks muddy in black and white, it will look muddy in thread.
- Compare light and dark backgrounds. Some icons rely on the white of the page to define their shape. On dark fabric, you may need to add a white underlay or stitch a solid background.
- Use proper stabilizer. For most apparel, a medium-weight cutaway stabilizer works well. For stretchy or thin fabrics, consider a tear-away or wash-away stabilizer depending on the project. Don’t skip this step.
- Check licensing before selling. The product description says it is perfect for websites, mobile apps, and illustration work, but if you plan to sell finished embroidered items or digital embroidery files, confirm the license agreement. Respect the designer’s terms.
- Keep a test sample. Once you stitch a test, keep it as a reference. It helps when you are discussing options with a client or deciding which icons to combine.
Final Thoughts on the 50 Back to School Icons – Filled Line Set
The 50 Back to School Icons – Filled Line set has earned a permanent spot in my design library. It is one of those rare icon collections that feels equally at home in a digital mockup and on a finished embroidered product. The filled line style strikes a perfect balance between simplicity and detail, and the 32 x 32 px grid gives it a structural integrity that makes digitizing straightforward.
Whether you are a small business owner prepping for back-to-school season, an Etsy seller building a cohesive product line, a hobbyist making personalized gifts for teachers and kids, or a commercial embroidery shop looking for versatile design assets, this set delivers practical value. It is not a set of overly complex illustrations that fight the fabric. It is a set of clean, confident icons that work with your machine, your materials, and your customers’ expectations.
If you are looking for a graphics collection that will actually hold up in production, this is worth your time. Just remember to test, check your hoop size, and respect the licensing. A well-chosen icon set is a tool, and when you use it thoughtfully, it makes your work better. The 50 Back to School Icons – Filled Line set is a tool I reach for often, and I think you will too.